SwiftUI Onboarding Framework Using Composable Architecture
Learn how to build a modular, scalable onboarding flow in SwiftUI with Composable Architecture and PostHog for seamless A/B testing and iteration.


Onboarding is the first impression your app makes, and I wanted to build a system that’s both modular and scalable, making it easy to adapt and expand. To take it a step further, I integrated A/B testing so I can quickly iterate and find the best experience for users. Using SwiftUI, Composable Architecture, and PostHog, I created a flexible onboarding framework that’s perfect for managing state and experimenting with different approaches. In this post, I’ll show you how it all comes together. Let’s dive in!
Project Overview
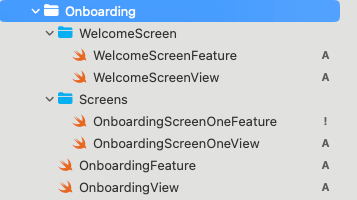
The onboarding system I built is structured around SwiftUI views and powered by Composable Architecture for state management and navigation. The goal was to keep the code modular and maintainable while supporting A/B testing through PostHog. Here’s a quick breakdown of how it works:
1. Core Structure
The onboarding flow starts with the OnboardingView, which acts as the main entry point. It uses a NavigationStack to handle transitions between different screens, such as the WelcomeScreenView and OnboardingScreenOneView.
2. Composable Architecture
Each screen has its own feature module, like WelcomeScreenFeature and OnboardingScreenOneFeature, which define the state, actions, and reducers for that part of the onboarding flow. This separation ensures modularity and makes it easy to test and extend.
3. Experiment Management
A shared state variable, onboardingExperiment, is used to fetch and apply experiment variants. This is handled within the OnboardingFeature reducer, where PostHog integrates to manage feature flags dynamically.
4. User Navigation and Interaction
Navigation between screens is driven by state changes, with user actions like tapping a button triggering state updates in the reducer. For example, tapping “Next” on the welcome screen transitions to the next onboarding step.
This structure ensures that adding new screens, adjusting logic, or testing different onboarding flows is simple and efficient. Each component is focused on a single responsibility, keeping the overall design clean and scalable.
OnboardingView and OnboardingFeature
At the heart of the onboarding framework is the OnboardingView, which acts as the entry point for the onboarding flow, and the OnboardingFeature, which manages the state and navigation logic. Together, they provide a modular and scalable foundation for building dynamic onboarding experiences.
OnboardingView
The OnboardingView is a SwiftUI component that uses a NavigationStack to handle screen transitions. Each screen in the onboarding flow is tied to a specific state in the OnboardingFeature reducer. Here’s how it looks:
public struct OnboardingView: View {
    @ObserveInjection var inject
    @State var store: StoreOf<OnboardingFeature>

    public init() {
        store = .init(initialState: .init(), reducer: {
            OnboardingFeature()
        })
    }

    public var body: some View {
        NavigationStack {
            WelcomeScreenView(store: store.scope(state: \.welcomeScreen, action: \.welcomeScreen))
                .navigationDestination(item: $store.scope(state: \.destination, action: \.destination)) { store in
                    switch store.case {
                    case let .nextView(store):
                        OnboardingScreenOneView(store: store)
                    }
                }
        }
        .enableInjection()
    }
}
OnboardingView
Key features of OnboardingView:
- NavigationStack: Handles navigation between different screens.
- State Scoping: Uses store.scope to provide scoped state and actions to child views.
- Dynamic Navigation: The navigationDestination ensures that new views are displayed based on the state of the onboarding flow.
This setup keeps the navigation logic simple yet flexible, allowing easy addition of new screens in the future.
OnboardingFeature
The OnboardingFeature defines the state, actions, and reducer logic for the onboarding process. It uses Composable Architecture to manage state transitions and user interactions. Here’s the implementation:
@Reducer
public struct OnboardingFeature: Sendable {
    public init() {}

    @ObservableState
    public struct State: Sendable {
        @Presents var destination: Destination.State?
        var welcomeScreen: WelcomeScreenFeature.State = .init()
        @Shared(.inMemory("onboardingExperiment")) var onboardingExperiment: String = "variant-base"
        public init() {}
    }

    public enum Action: Sendable {
        case welcomeScreen(WelcomeScreenFeature.Action)
        case destination(PresentationAction<Destination.Action>)
        case fetchOnboardingExperiment
        case setOnboardingExperiment(String)
    }

    @Reducer(state: .sendable, action: .sendable)
    public enum Destination {
        case nextView(OnboardingScreenOneFeature)
    }

    @Dependency(\.continuousClock) var continuousClock
    public var body: some ReducerOf<Self> {
        Scope(state: \.welcomeScreen, action: \.welcomeScreen) {
            WelcomeScreenFeature()
        }
        Reduce { state, action in
            switch action {
            case .fetchOnboardingExperiment:
                return .run { send in
                    try? await continuousClock.sleep(for: .seconds(1.5))
                    if let variant = FeatureFlag.getFeatureFlag("onboarding-experiment") {
                        await send(.setOnboardingExperiment(variant))
                    }
                }
            case let .setOnboardingExperiment(experiment):
                state.$onboardingExperiment.withLock { $0 = experiment }
                return .none
            case .welcomeScreen(.delegate(.next)):
                state.destination = .nextView(.init())
                return .none
            case .destination(.presented(.nextView(.delegate(.back)))):
                state.destination = nil
                return .none
            case .destination, .welcomeScreen:
                return .none
            }
        }
        .ifLet(\.$destination, action: \.destination)
    }
}
OnboardingFeature
Key features of OnboardingFeature:
- State Management: The State struct holds all necessary variables, including the current screen and the onboarding experiment variant.
- Reducer Logic: Handles all possible actions, including fetching the experiment variant and managing navigation.
- Feature Flags: Integrates with PostHog to fetch and set feature flags dynamically.
- Dynamic Navigation: Uses the Destination enum to manage transitions between screens.
By combining OnboardingView and OnboardingFeature, we achieve a clean separation of concerns:
- The view focuses on UI and navigation.
- The reducer handles state transitions and business logic.
This modular approach makes the onboarding flow easy to maintain and extend, while the integration of A/B testing allows for quick iteration on user experience improvements.
OnboardingScreenOneFeature and OnboardingScreenOneView
The OnboardingScreenOneFeature and OnboardingScreenOneView components represent a single step in the onboarding flow. This structure is modular, with each feature acting as a self-contained unit. The OnboardingScreenOneFeature serves as a template for additional screens, ensuring consistency in navigation and state management.
OnboardingScreenOneFeature
The OnboardingScreenOneFeature defines the state, actions, and reducer logic for a single onboarding screen. It includes a reusable Delegate enum that handles navigation actions, making it easy to implement “Next” and “Back” transitions.
@Reducer
public struct OnboardingScreenOneFeature: Sendable {
    public init() {}

    @ObservableState
    public struct State: Sendable {
        @Shared(.inMemory("onboardingExperiment")) var onboardingExperiment: String = "variant-base"
        public init() {}
    }

    public enum Action: Sendable {
        case nextTapped
        case backTapped
        case loginTapped
        case delegate(Delegate)

        public enum Delegate: Sendable {
            case next
            case back
        }
    }

    public var body: some ReducerOf<Self> {
        Reduce { _, action in
            switch action {
            case .nextTapped:
                return .send(.delegate(.next))
            case .backTapped:
                return .send(.delegate(.back))
            case .loginTapped:
                // Additional logic for a "Login" button, if applicable
                return .none
            case .delegate:
                return .none
            }
        }
    }
}
OnboardingScreenOneFeature
Key Features:
- State Management: Holds screen-specific state variables, such as onboardingExperiment, allowing for dynamic behavior.
- Reusable Navigation Delegate: The Delegate enum ensures that each screen supports next and back actions for seamless navigation.
- Modular Design: This feature acts as a template for creating additional screens by implementing similar state and actions.
OnboardingScreenOneView
The OnboardingScreenOneView is the SwiftUI representation of the onboarding screen. It connects to its feature’s store and triggers actions in response to user interactions.
struct OnboardingScreenOneView: View {
    @ObserveInjection var inject
    @State var store: StoreOf<OnboardingScreenOneFeature>

    init(store: StoreOf<OnboardingScreenOneFeature>) {
        self.store = store
    }

    var body: some View {
        VStack {
            Text("Fancy Onboarding View Stuff")

            EventButton(category: .onboarding, object: "next_button", verb: .click, params: ["screen": "screen_one"]) {
                store.send(.nextTapped)
            } label: {
                Text("Next")
            }

            EventButton(category: .onboarding, object: "back_button", verb: .click, params: ["screen": "screen_one"]) {
                store.send(.backTapped)
            } label: {
                Text("Back")
            }
        }
        .navigationBarBackButtonHidden(true)
        .enableInjection()
    }
}
OnboardingScreenOneView
Key Features:
- Action Handling: Triggers nextTapped and backTapped actions when the corresponding buttons are pressed.
- Event Tracking: Uses EventButton to send analytics events (e.g., button clicks) to PostHog or other tracking tools.
- Customizable Content: The view can easily be updated with unique content while keeping navigation and state management consistent.
Using OnboardingScreenOne as a Template
The OnboardingScreenOneFeature and OnboardingScreenOneView provide a reusable foundation for additional screens:
- Copy the OnboardingScreenOneFeature structure and update its logic to match the specific needs of the new screen.
- Customize the OnboardingScreenOneView content while reusing the delegate actions for navigation.
By ensuring that every onboarding screen includes the Delegate enum for next and back actions, this framework maintains consistency and simplifies the navigation logic across all steps of the onboarding process. This modularity makes the onboarding flow scalable and easy to extend.
Conclusion
Building a modular and scalable onboarding framework is essential for delivering a seamless user experience and adapting quickly to new requirements. By combining SwiftUI with Composable Architecture, we achieve clean separation of concerns, making the onboarding flow easy to maintain, test, and extend. Adding A/B testing through tools like PostHog further enhances the framework, enabling rapid iteration and data-driven improvements.
Each component, from OnboardingView to individual screen features like OnboardingScreenOneFeature, is designed with flexibility in mind. The use of reusable patterns, such as the Delegate enum for navigation, ensures that expanding the onboarding flow is straightforward and consistent.
This approach empowers developers to focus on refining the onboarding experience, whether it’s adding new screens, experimenting with different flows, or tracking user behavior. If you’re looking to create an adaptable and efficient onboarding process, this framework offers a strong foundation to build upon.


Discussion